New Thermal Paste RTX 2080 SUPER GPU
Re-pasting your GPU with new thermal paste can be daunting. I found out it is not as hard as it is made out to be. If you can re-paste a CPU. You will be fine with a GPU. Take it slow and pay careful attention to what you are doing.
Back in March 2020 when GPUs were still acceptably priced I purchased a Gigabyte RTX 2080 SUPER™ WINDFORCE OC 8G. Just under 2 years later I started having problems.
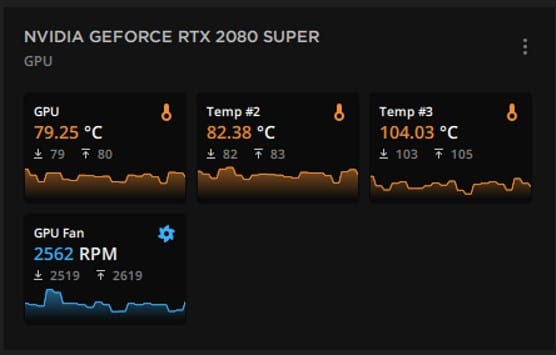
The Problem – Overheating and Thermal Throttling
Over the last few months the GPU would frequently ignore the fan curve I had set for it and max the fans out in an attempt to cool the card. I also noticed the card was thermal throttling under loads that would not have been a problem when it was new. I now own a hot leaf blower.
My first though was to lower the power limit, increase the fan curve and generally dial back the performance. This did not sit right with me as I would not be getting the advertised performance and would not fix the underlying issue.
The Solution – New Thermal Paste for GPU
Given todays economy and the price of GPUs, I could not afford to replace mine. So I decided to attempt a repair. Having never pulled a GPU apart before this seemed quite daunting. Turns out it is no different to re-pasting your CPU. Just a little more care an preparation is required.
Tools and Consumables Needed
Small Phillips Head Screwdriver
Small Flat Head Screwdriver
Thermal Compound (Noctua NT-H2)
Cotton Buds (Q-tips)
Lint Free Cloth
Cleaning Solution (akasa TIM clean)
Note: The alcohol wipes that came with the NT-H2 did not do a great job of removing the thermal paste on my card and that is why I opted for the akasa TIM clean.
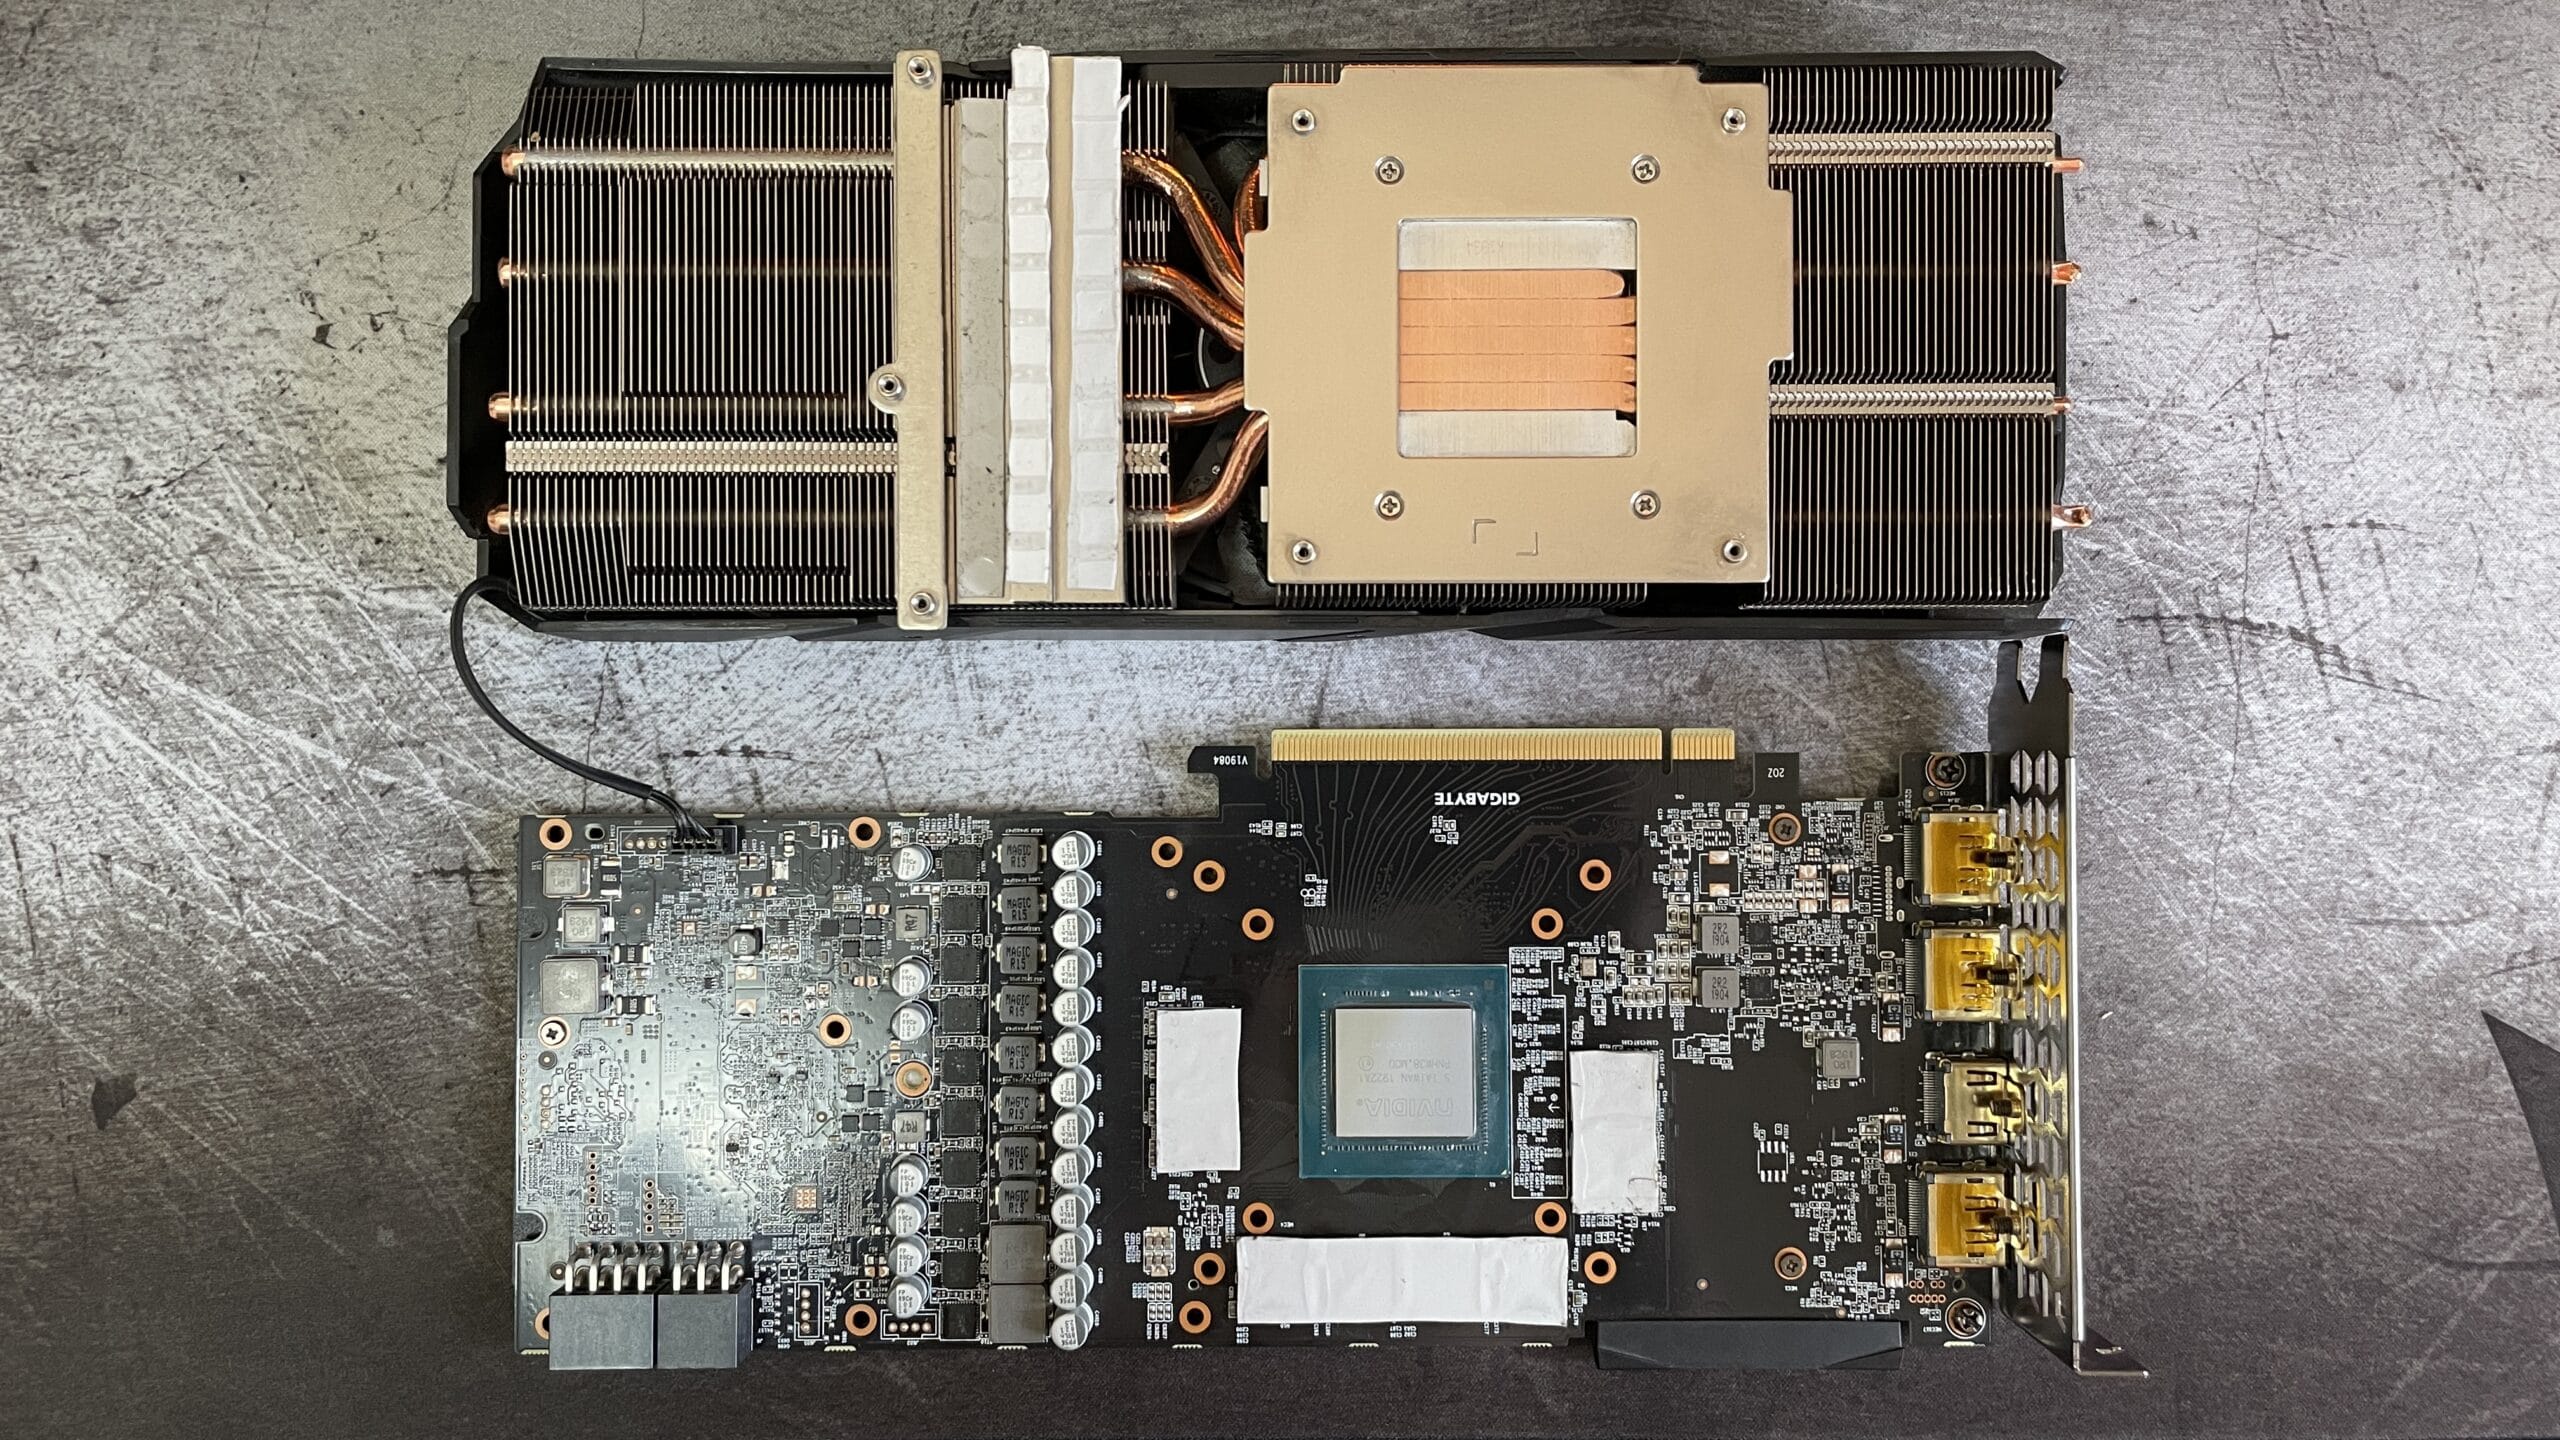
Disassembly of GPU
There are 7 screws on the backplate that need to be removed.
Note: Some GPUs have a white sticker over the top of one of the screws, break this sticker and you will void your card’s warranty. Most Gigabyte cards do not have this.
I have numbered each screw in the order I removed them making sure that the 4 screws holding the heatsink to the GPU are removed alternately to reduce the chance of any potential damage to the GPU when the pressure from the screws is released.
Click on the image below for a closer look.
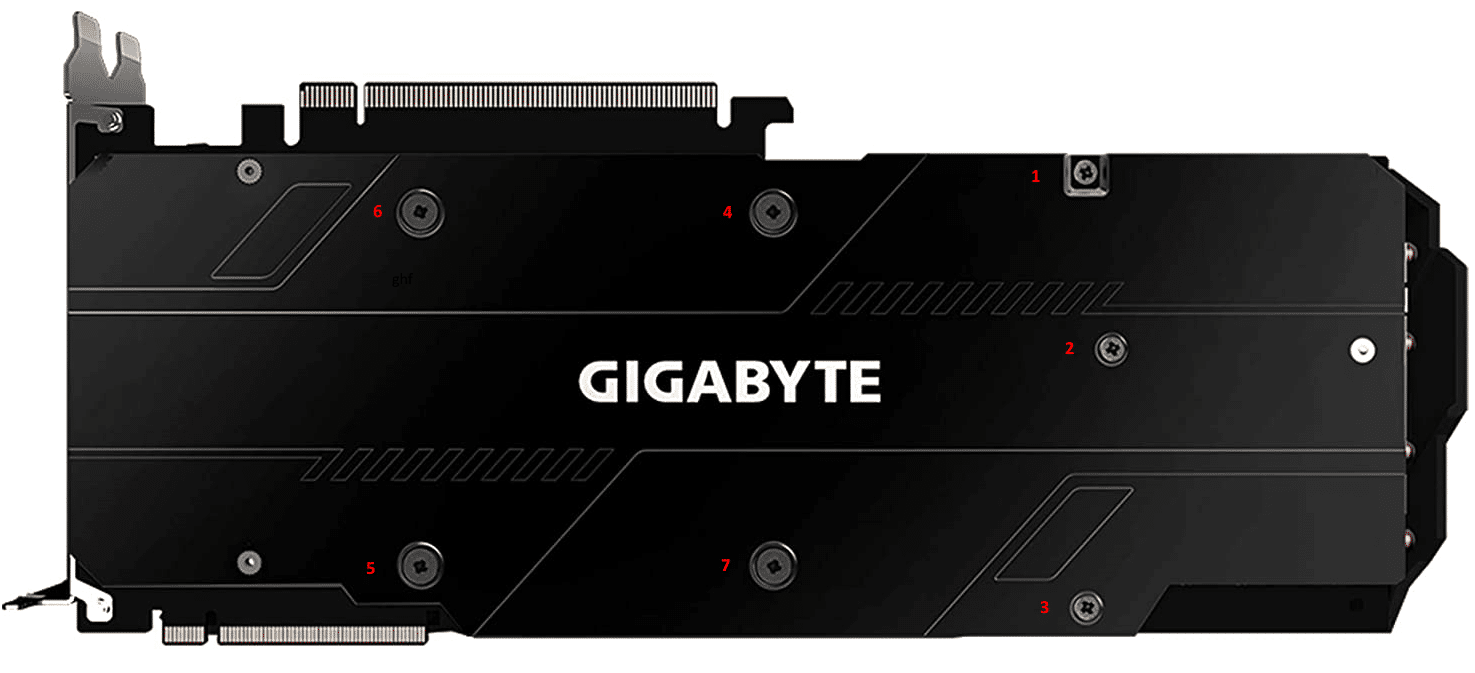
As you remove the screws I suggest arranging them on your work surface in the same pattern they were when attached to the board, this make reassembly easy.
The next step is to separate the cooling assembly from the mainboard, if the card is cold a significant amount of force is required to separate the two as the thermal paste will bond the two together.
Make sure when applying pressure to hold the mainboard firmly and pull on the heatsink and not the attached fans or plastic housing. Work you way from one end of the card to the other working on separating the two, it will just pop apart.
The fans will be connected to the mainboard by a short power cable. You do not need to disconnect this, however depending on your workspace you may wish to.
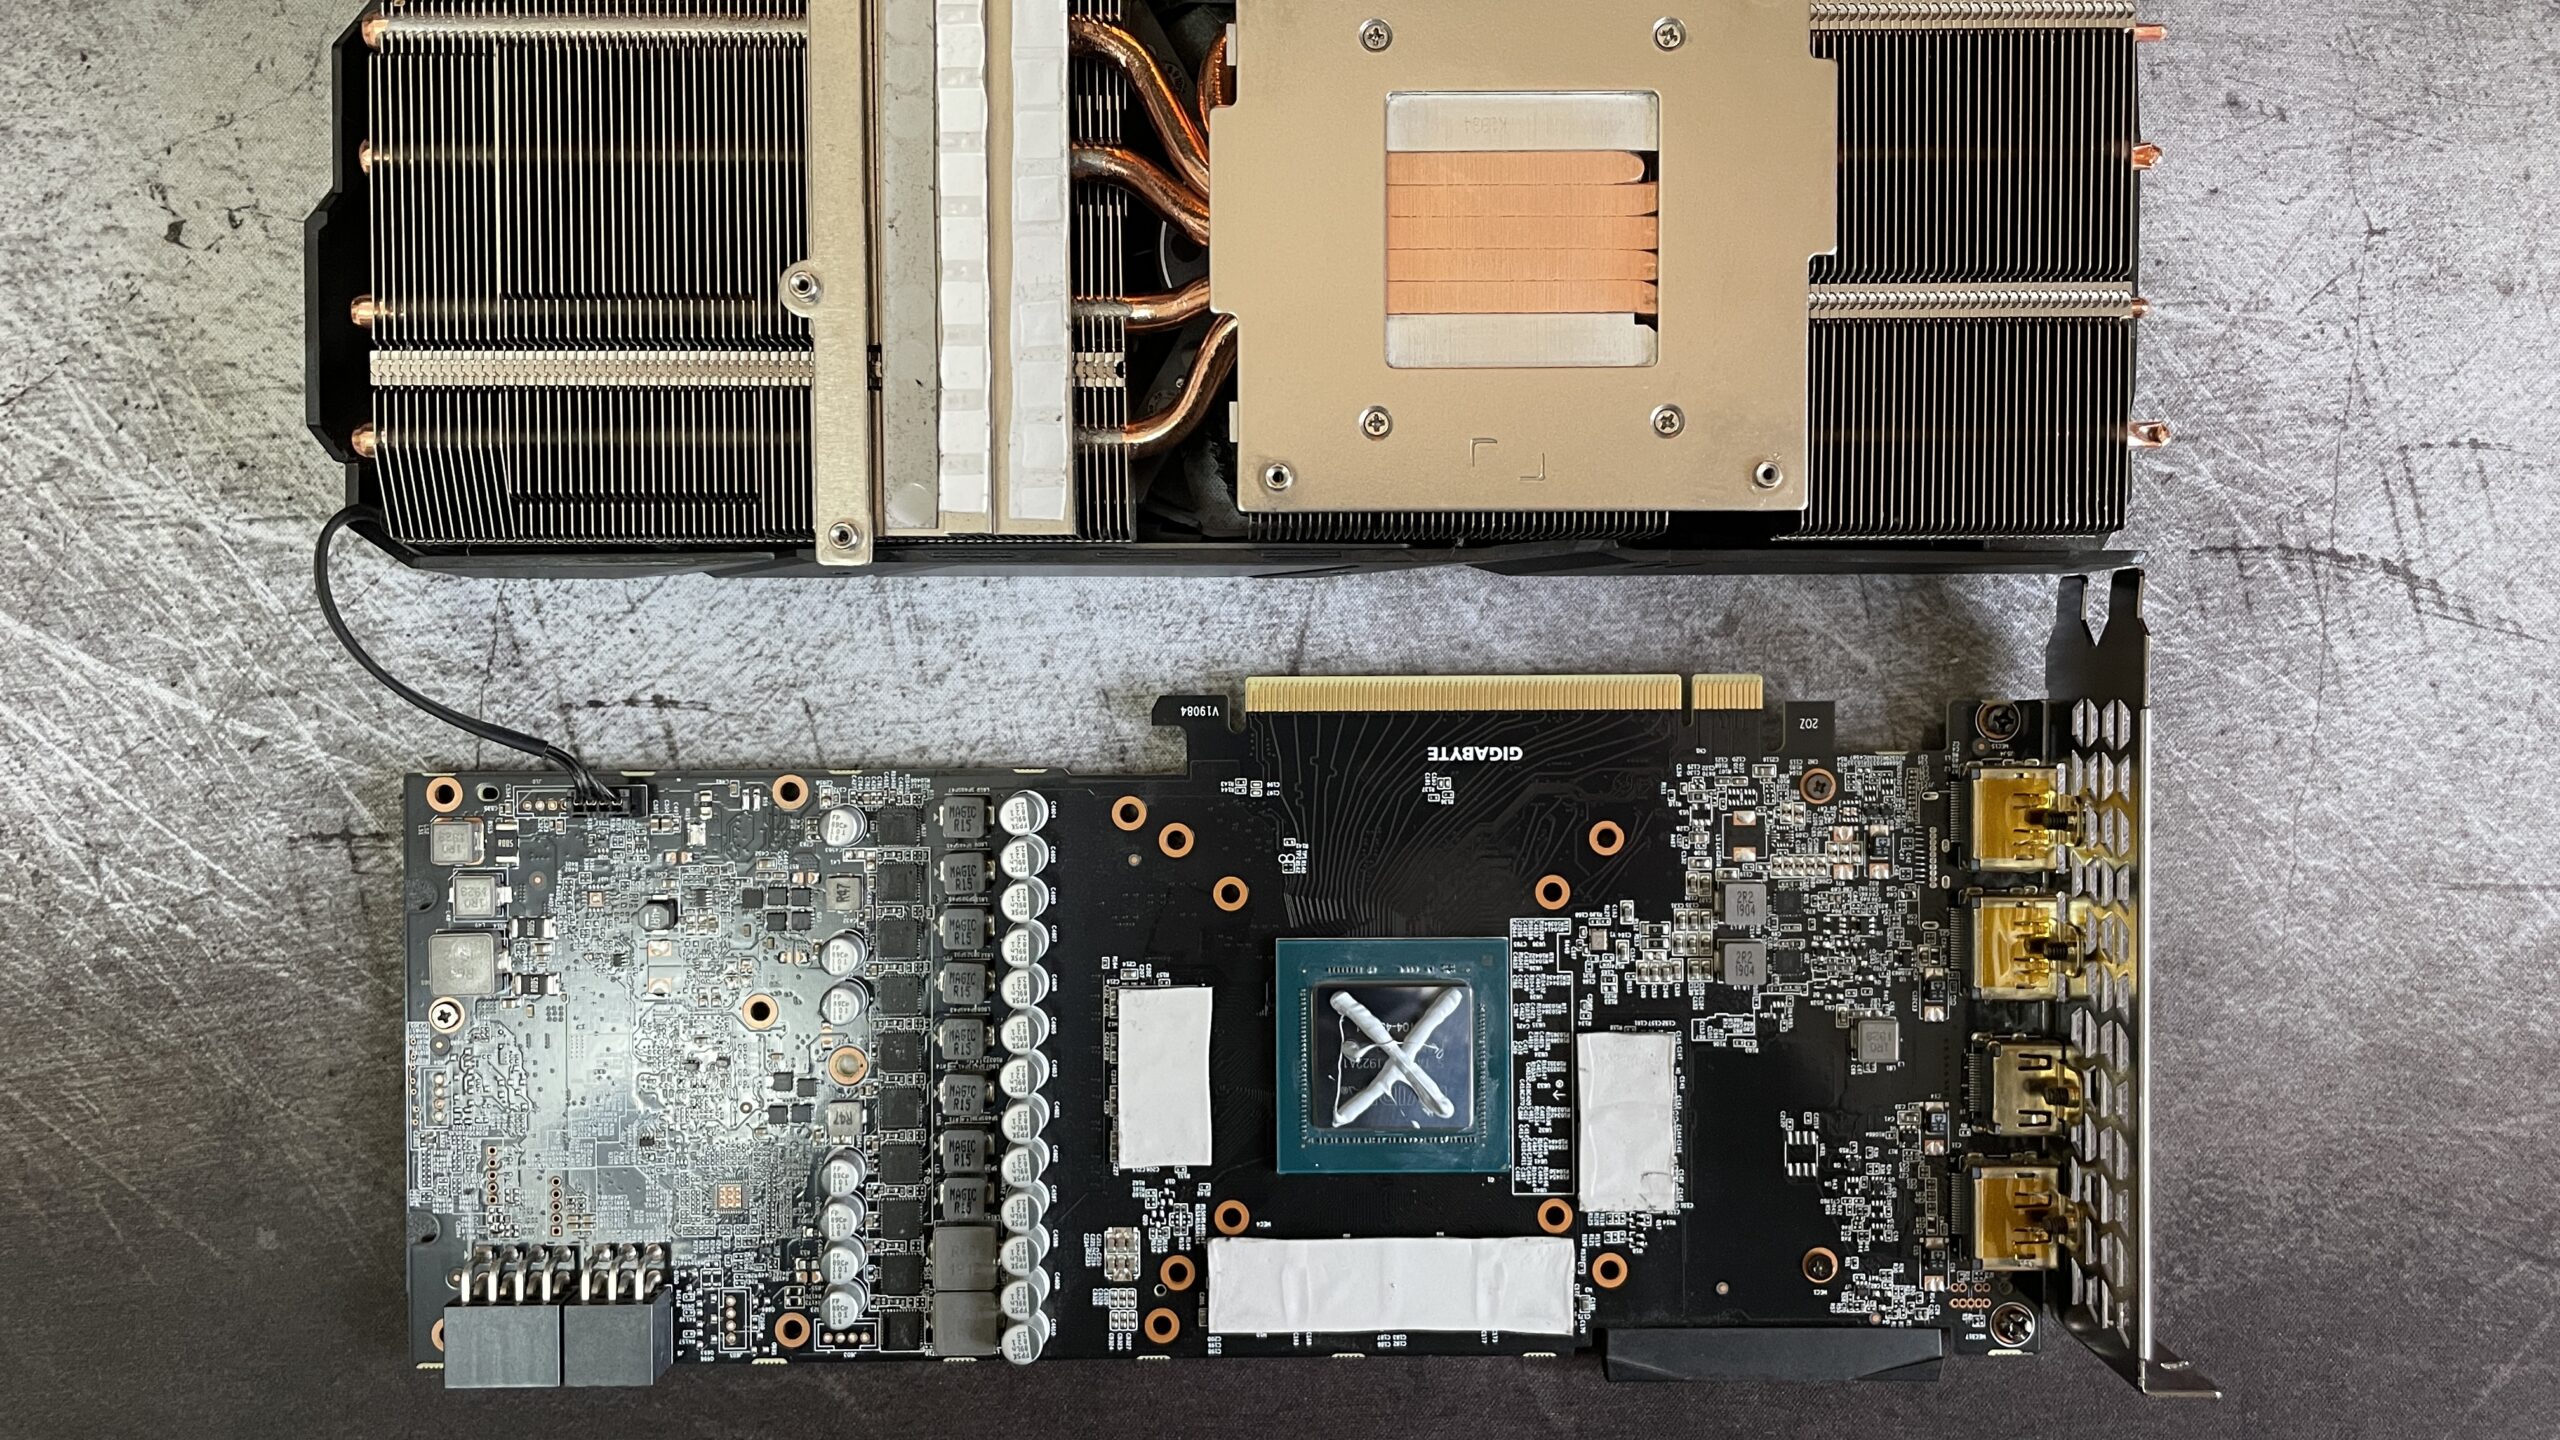
Cleaning Old Thermal Paste and Thermal Pads
Once you have separated the heatsink from the mainboard you should see something like the picture below. In my example below you can see the quantity of thermal paste on the GPU is insufficient, it is dry and chalk like and not fit for purpose.
Click on the image below for a closer look.
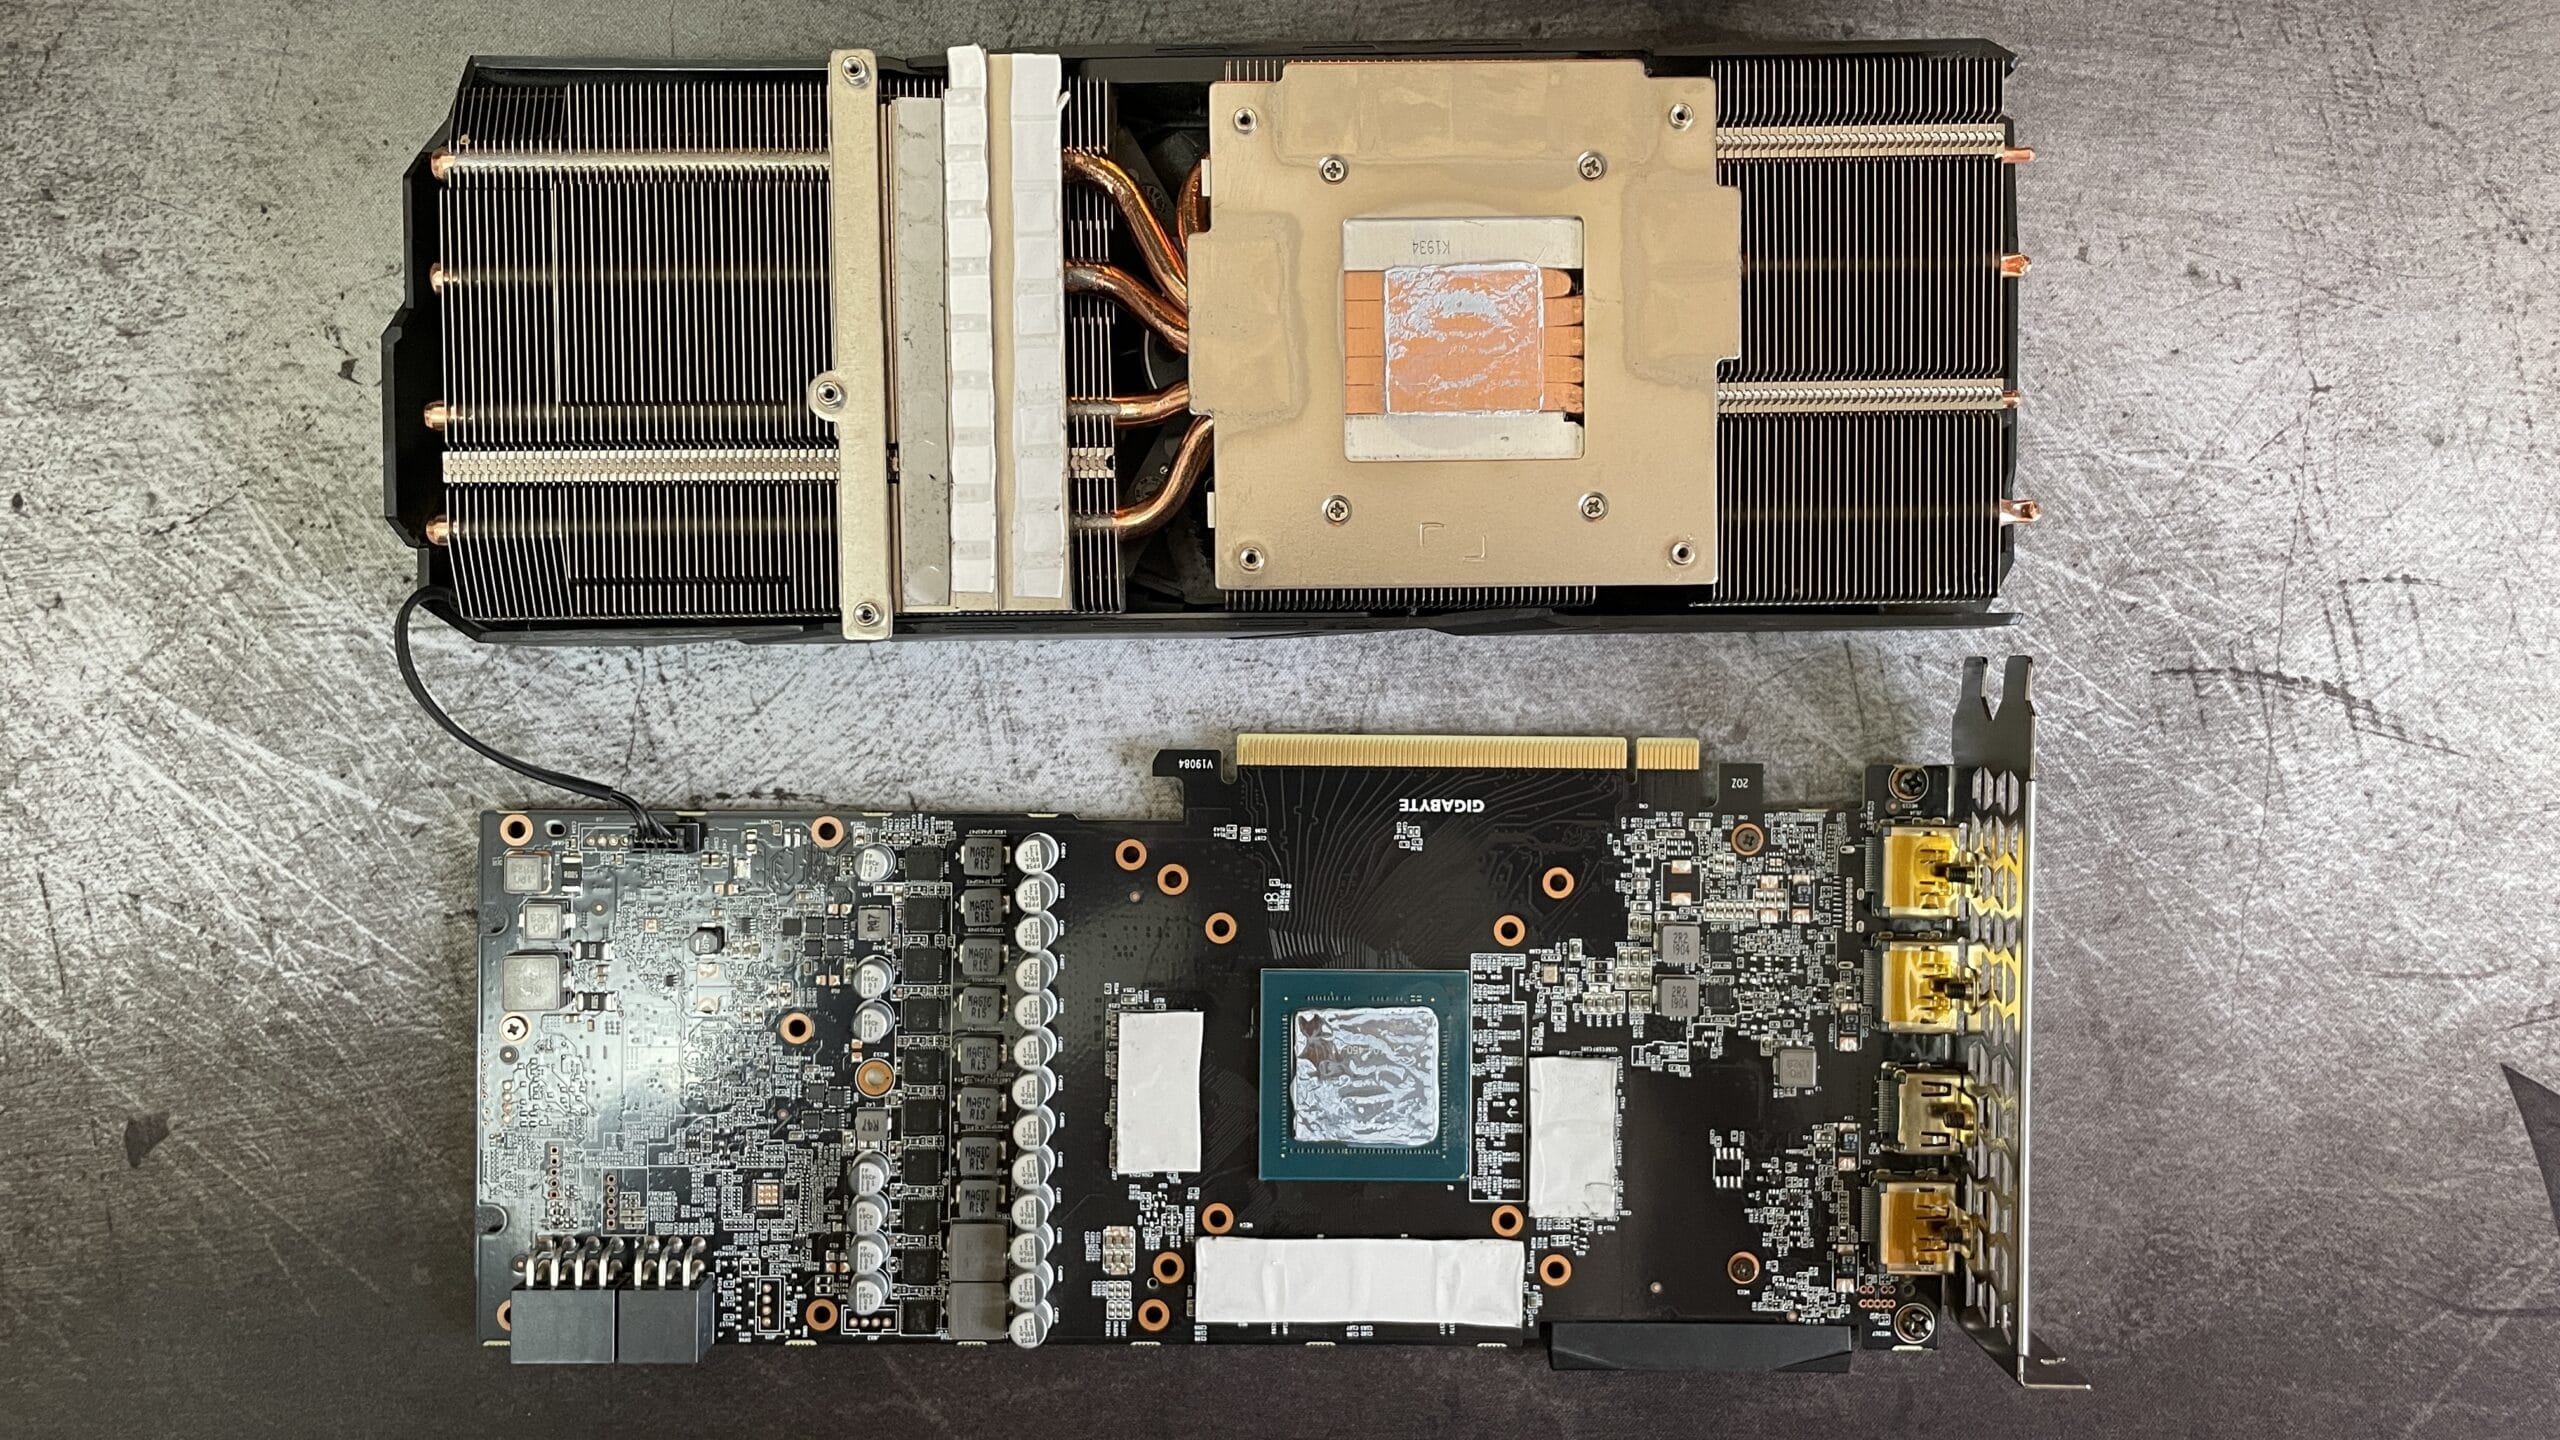
The thermal pads were in good condition, the pads for the VRMs remained attached to the heatsink and the pads on the memory stayed on the mainboard. Your mileage here may vary, be prepared to reposition them with care.
Take your lint free cloth and dampen a small area of the cloth with your cleaning solution, work this into the residual thermal paste on the heatsink, repeat this process using a new section of your cloth until the heatsink and heat pipes are clean and shiny.
Note: Do not saturate the cloth so that you have excess cleaning fluid dripping off the cloth not much cleaning fluid is required.
Repeat this process for the GPU, take care not to snag the small capacitors surrounding the GPU, don’t rush this.
For the more stubborn residue you can moisten a cotton bud and work that gently over the residue to remove it along the edges of the GPU.
Note: Take care when working on the GPU it is not protected by an IHS (Integrated Heat Spreader) like a CPU, here the actual chip is exposed.
This should be something close to your end result.
Click on the image below for a closer look.
Thermal Paste Application and Reassembly
Now that you GPU is clean and ready for it’s new thermal paste.
I did quite a bit of research on the best way to apply thermal paste and have repasted many CPUs in my time. The size of the chip will influence your decision here on both quantity and method.
Check out this video to see how thermal paste spreads under pressure. Remember that the pressure applied by a human hand is significantly less than screwing the heatsink to the mainboard and will be applied more evenly. Personally I think all application methods are valid as long as you apply enough paste.
This is what I ended up doing for my card.
Click on the image below for a closer look.
Next carefully reposition the heatsink onto the mainboard with the backplate facing up.
Start putting the screws back in. You should do this in the reverse order you took them out in starting with the 4 main screws holding the heatsink to the GPU.
Ensure you tighten them evenly so as to keep the pressure on the GPU as even as possible and ensure no damage is done and the thermal paste spreads evenly.
Note: Do not overtighten the screws.
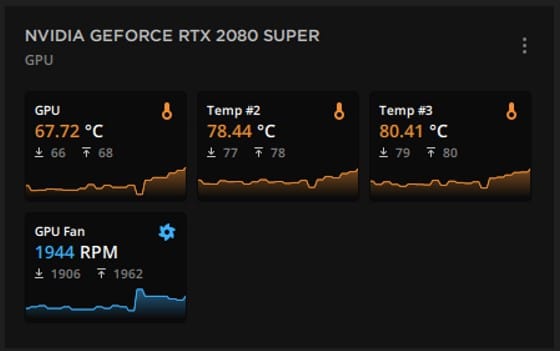
The Results
I think these results speak for themselves.
Lower temps all round, quieter and slower fan and faster GPU.
| GPU (°C) | VRMs (°C) | Memory (°C) | Fan Speed (rpm) | GPU (Mhz) | |
|---|---|---|---|---|---|
| Old | 79.25 | 82.38 | 104.03 | 2562 | 1770 |
| New | 67.72 | 78.44 | 80.41 | 1944 | 1875 |
| Difference | -11.53 | -3.94 | -23.62 | -618 | +105 |